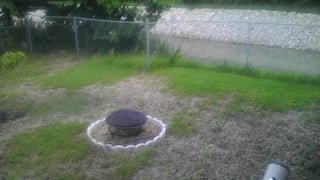
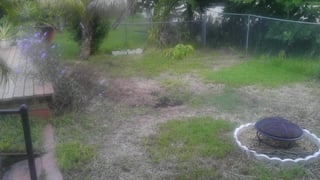
To keep things simple (mainly for my benefit), lets go with:
Therefore you have an area of 20% "healthy" lawn remaining.
Depending on what you read and from where it comes, it's "generally" said it is worth the time and effort to repair a lawn that has 50% to 66.6% healthy lawn area remaining, anything less than 50% is better served by removing everything and starting anew.
Personally I don't buy into that 100%, I think other factors come into the decision making process eg
Below I'm going to offer you both options, starting anew or repair, you can then decide which way you want to go.
Regardless which option you go with:
The vast majority of the work should be carried out mid Spring to very early Summer (the closer to mid Spring the better IMHO).
Get a "professional" soil test done, this will tell you if your soil requires any kind of amendment(s) for growing a healthy lawn.
Starting anew (via creating a stale seedbed):
At the beginning of Spring use a cultivar/tiller to till the top 4 to 6 inches (100 to 150mm).
Then with a heavy-duty metal garden rake, work the tilled area to remove any large stones, vegetation (including roots, wood, etc) and foreign objects.
Afterward, the worked area should be as close to final grade as you can get it, the flatter you can get it the better (try your best to avoid bumps and dips).
Spread an inch (25mm) or two (50mm) thick layer of high quality compost over the complete area.
With the cultivar/tiller, till the complete area again to work the compost layer into the top 4 to 6 inches (100 to 150mm).
Then again with a heavy-duty metal garden rake, work the tilled area to remove any large stones, vegetation (including roots, wood, etc) and foreign objects.
Afterward, the worked area should be as close to final grade as you can get it, the flatter you can get it the better (try your best to avoid bumps and dips).
If there is no rain forecast, lightly wet down the surface.
A week later go out there with a (sharp) hoe and remove any weeds (vegetation) you see.
- Repeat this weekly hoeing for the following 3 to 4 weeks.
You now have a stale seedbed, and are ready for your new lawn.
Lay down a 1inch (25mm) thick layer of high quality compost over the complete area.
- With a heavy-duty metal garden rake level this compost layer to your final grade.
Lay your St Augustine sod (instant lawn), when doing so, stagger the joints as if you were building a brick wall, also take the time to ensure you get nice tight joints.
Lay a scaffold-board over the top of the sod. Shuffle along the board a few times, this will ensure you get good contact between the sod and the soil underneath. Move the board over the width of the board, repeat "shuffle" process. Repeat, repeat... until you've tamped down the complete area.
Lightly water your newly laid lawn, you will want to do this daily for the first couple of weeks (assuming you have no rain). After that, water lightly every 2 to 3 days. Basically you don't want the sod drying out (contracting and gaps appearing along the sod joint lines).
A month after installing your sod, you can revert to you "normal" watering schedule (or follow the recommended watering requirements for St Augustine).
If you wish to save some money and can wait some time before having a fully established lawn you can install plugs (normally about 2inch/50mm diameter) of St Augustine at 12inch (300mm) centres. Plugs should be planted in a staggered pattern.
If you go the "plug" route, I recommend also getting enough Annual Ryegrass seed to seed the complete area. Doing so will fill in the bare areas between the plugs, give you a green looking lawn while the plugs establish themselves (begin to spread and fill in), and help prevent weeds growing in those bare areas...
Lightly water your newly laid lawn (plugs & seed), you will want to do this daily for the first couple of weeks (assuming you have no rain). After that, water lightly every 2 to 3 days. Basically you don't want the ground drying out.
A month after installing your newly laid lawn, you can revert to you "normal" watering schedule (or follow the recommended watering requirements for St Augustine).
Repair (or starting anew without tilling):
Mid Spring, with a light-duty metal rake, rake the complete area to gather up all the "dead" material.
With a (sharp) spade or an edging tool, give the healthy grass areas nice clean straight edges (especially important if you are going to lay sod).
If going the sod laying route, do the extra step below:
- With a (sharp) spade, "feather" a 3 to 4ft (900 to 1200mm) wide strip around the the perimeter of the healthy grass areas to remove a "thin" wedge shape. This will allow the new installed sod to gently grade into the existing grass area (thus ensuring you don't end up with a small "step" where new meets existing).
With a core aerator (preferably one that pulls plugs out of the ground), aerate the complete area. When aerating it's best to work in one direction (up and down your garden), then cover the area again, but the second time working perpendicular (left to right across your garden) to the first.
Lay down a 1inch (25mm) thick layer of high quality compost over the complete area.
- With a heavy-duty metal garden rake level this compost layer to your final grade.
Lay your St Augustine sod (instant lawn), when doing so, stagger the joints as if you were building a brick wall, also take the time to ensure you get nice tight joints.
Lay a scaffold-board over the top of the sod. Shuffle along the board a few times, this will ensure you get good contact between the sod and the soil underneath. Move the board over the width of the board, repeat the "shuffle" process. Repeat, repeat... until you've tamped down the complete area.
Lightly water your newly laid lawn, you will want to do this daily for the first couple of weeks (assuming you have no rain). After that, water lightly every 2 to 3 days. Basically you don't want the sod drying out (contracting and gaps appearing along the sod joint lines).
A month after installing your sod, you can revert to you "normal" watering schedule (or follow the recommended watering requirements for St Augustine).
If you wish to save some money and can wait some time before having a fully established lawn you can install plugs (normally about 2inch/50mm diameter) of St Augustine at 12inch (300mm) centres. Plugs should be planted in a staggered pattern.
If you go the "plug" route, I recommend also getting enough Annual Ryegrass seed to seed the complete area. Doing so will fill in the bare areas between the plugs, give you a green looking lawn while the plugs establish themselves (begin to spread and fill in), and help prevent weeds growing in those bare areas...
Lightly water your newly laid lawn (plugs & seed), you will want to do this daily for the first couple of weeks (assuming you have no rain). After that, water lightly every 2 to 3 days. Basically you don't want the ground drying out.
A month after installing your newly laid lawn, you can revert to you "normal" watering schedule (or follow the recommended watering requirements for St Augustine).
If you wish to have a green looking lawn now and through the Winter, I recommend throwing down some Annual Ryegrass just to give you the look:
When daytime temperatures have dropped into the low 70°F (20°C) or into the 60°F (high teens °C) go out into the area with a light-duty metal rake and rake the complete area. Gather up as much "dead" material as possible, but keep in mind it doesn't have to be perfect (save perfection until you do the real work in Springtime).
Afterward, with a heavy-duty metal rake, scratch-up the surface of soil ie Break up the surface of the soil a little.
Spread (broadcast, sow) enough Annual Ryegrass seed to seed the complete area.
Spread ½inch (12.5mm) thick layer of high quality compost over the complete area ie Bury the seed under this thin layer of organic material. Doing so will help:
Lightly water the complete area, you will want to do this daily for the first couple of weeks (assuming you have no rain). After that, water lightly every 2 to 3 days. Basically you don't want the ground drying out.
Once the grass is 4inches (100mm) high or higher, it is ready for its first mowing.
- Personally, I would mow to a final cut height of 3inches (75mm) or higher. The higher the better IMHO. You don't want to mow Annual Ryegrass too short, especially in your part of the country (warm and humid)...
I wouldn't do any major lawn care work at this time of year (late Summer, early Autumn/Fall) on a warm-season lawn.
I totally understand why you don't want to move away from having a St Augustine lawn, but I am going to leave below a few references:
Good luck! and I hope the above helps a little.


